Why =IMAGE() Doesn't Work for Canva Bulk Create (And What Actually Does)
The =IMAGE() formula in Google Sheets looks like it embeds images — it doesn't. Here's why Canva Bulk Create ignores it, plus a working Apps Script solution that actually embeds the images.

If you've tried to use Google Sheets with Canva Bulk Create and added a column of =IMAGE() formulas, you've run into one of the most frustrating surprises in this workflow: Canva completely ignores them.
The images look fine in your sheet. The formula renders a visible preview. Export to XLSX, upload to Canva — blank slots.
Here's exactly what's going wrong and two ways to fix it: a free Apps Script approach for people who want full control, and a faster option for larger batches.
What =IMAGE() Actually Does (and Doesn't Do)
The =IMAGE("https://...") formula in Google Sheets is a display formula. It tells Google Sheets to fetch and render a preview of the image inside the cell while you're viewing the spreadsheet. That's all it does.
The image data never lives in your sheet. There's no binary image data stored in the file — just a formula string that Google's rendering engine resolves in real time. Think of it like a <img src="..."> tag in HTML: the image appears on screen, but the file itself is just a reference.
When you export your Google Sheet to XLSX, that formula becomes either an empty cell or plain text. The XLSX file has no image in it, because there was never an image in the Google Sheet to begin with — just an instruction to go fetch one.
Canva Bulk Create reads the XLSX file directly. It looks for images embedded in cells as DrawingML objects — actual binary image data stored inside the file. It finds the formula output (nothing), so the image slot in your design stays blank.
The =IMAGE() formula is a viewer shortcut, not a storage mechanism. For Canva Bulk Create, you need the real thing.
What Actually Works: Google Apps Script
Google Sheets has a separate API for in-cell images, accessible via Apps Script: SpreadsheetApp.newCellImage(). Unlike =IMAGE(), this actually stores image data in the cell. When you export to XLSX, the image travels with the file — and Canva can read it.
Here's a working script that reads image URLs from one column and embeds the actual images into another column:
function embedImages() {
  const sheet = SpreadsheetApp.getActiveSheet();
  const startRow = 2;  // adjust to your first data row
  const urlCol = 5;    // column E — change to match your URL column
  const imgCol = 19;   // column S — change to your target image column
  const lastRow = sheet.getLastRow();

  const urls = sheet.getRange(startRow, urlCol, lastRow - startRow + 1, 1).getValues();

  urls.forEach((row, i) => {
    const url = row[0];
    if (!url || !url.toString().startsWith('http')) return;

    try {
      const image = SpreadsheetApp.newCellImage()
        .setSourceUrl(url)
        .build();
      sheet.getRange(startRow + i, imgCol).setValue(image);
      Utilities.sleep(150); // avoid hitting Google's rate limits
    } catch (e) {
      sheet.getRange(startRow + i, imgCol).setValue('ERR: ' + e.message);
    }
  });
}
Before you run it, update two numbers
urlCol is the column number where your image URLs live. Column A = 1, B = 2, C = 3 … E = 5, G = 7, J = 10, S = 19. In the example screenshots below, URLs are in column E (5).
imgCol is where you want the embedded images to appear. In the example, that's column S (19) — a new column added to the right of existing data.
startRow should be 2 if your first row is a header. Change it to 1 if data starts on row 1 with no header.
Step-by-Step Walkthrough
Step 1: Open your Google Sheet
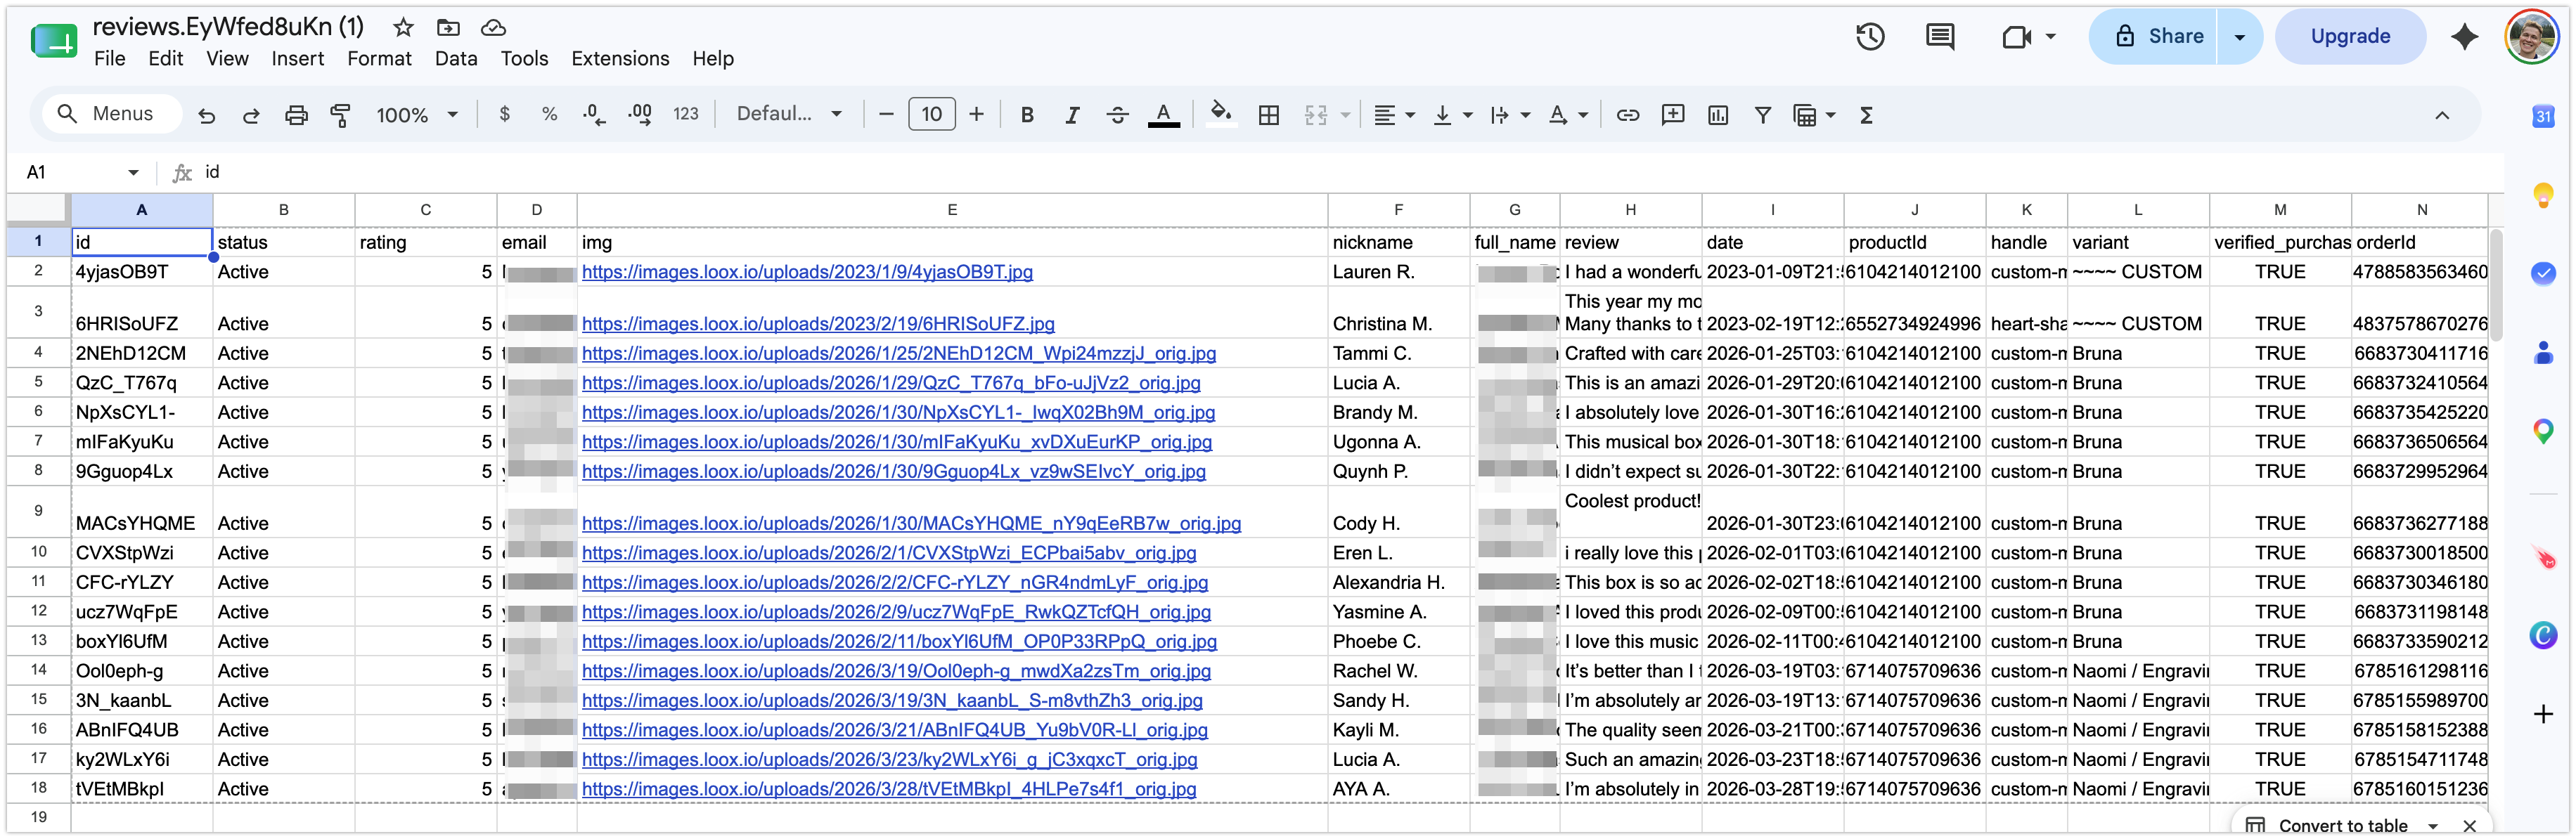
Your sheet needs a column of image URLs — any publicly accessible URLs work. Here's what a typical sheet looks like before running the script, with image URLs visible in column E:
Step 2: Open the Apps Script editor
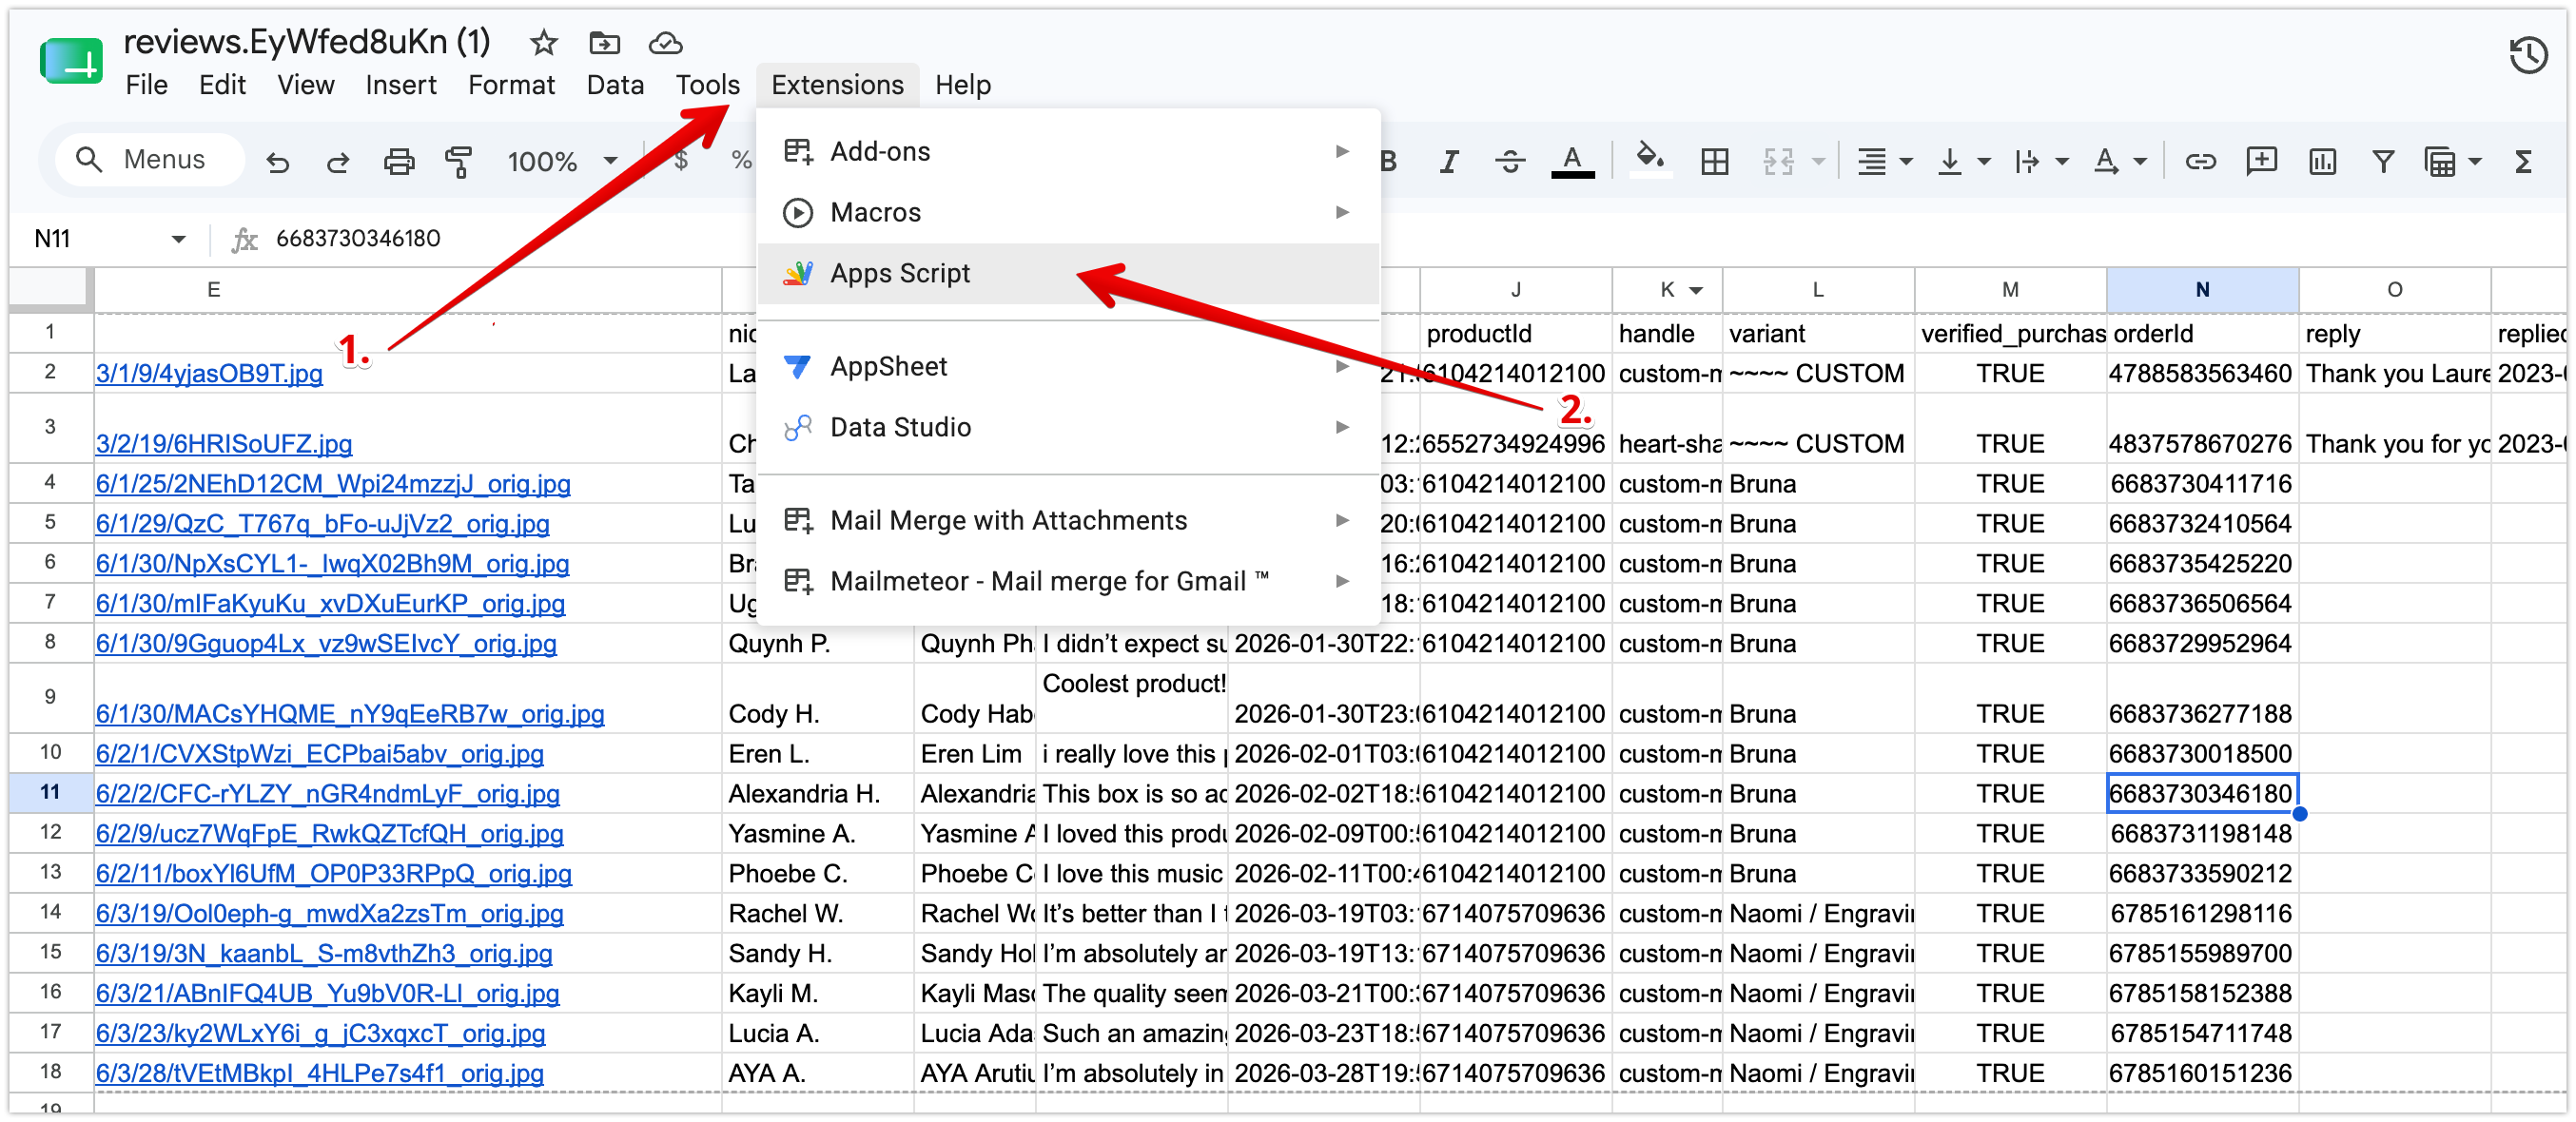
In the menu bar, go to Extensions → Apps Script.
This opens the Apps Script editor in a new browser tab with a default empty function.
Step 3: Paste the script
Delete the default content and paste the full embedImages function. The editor will look like this after pasting:
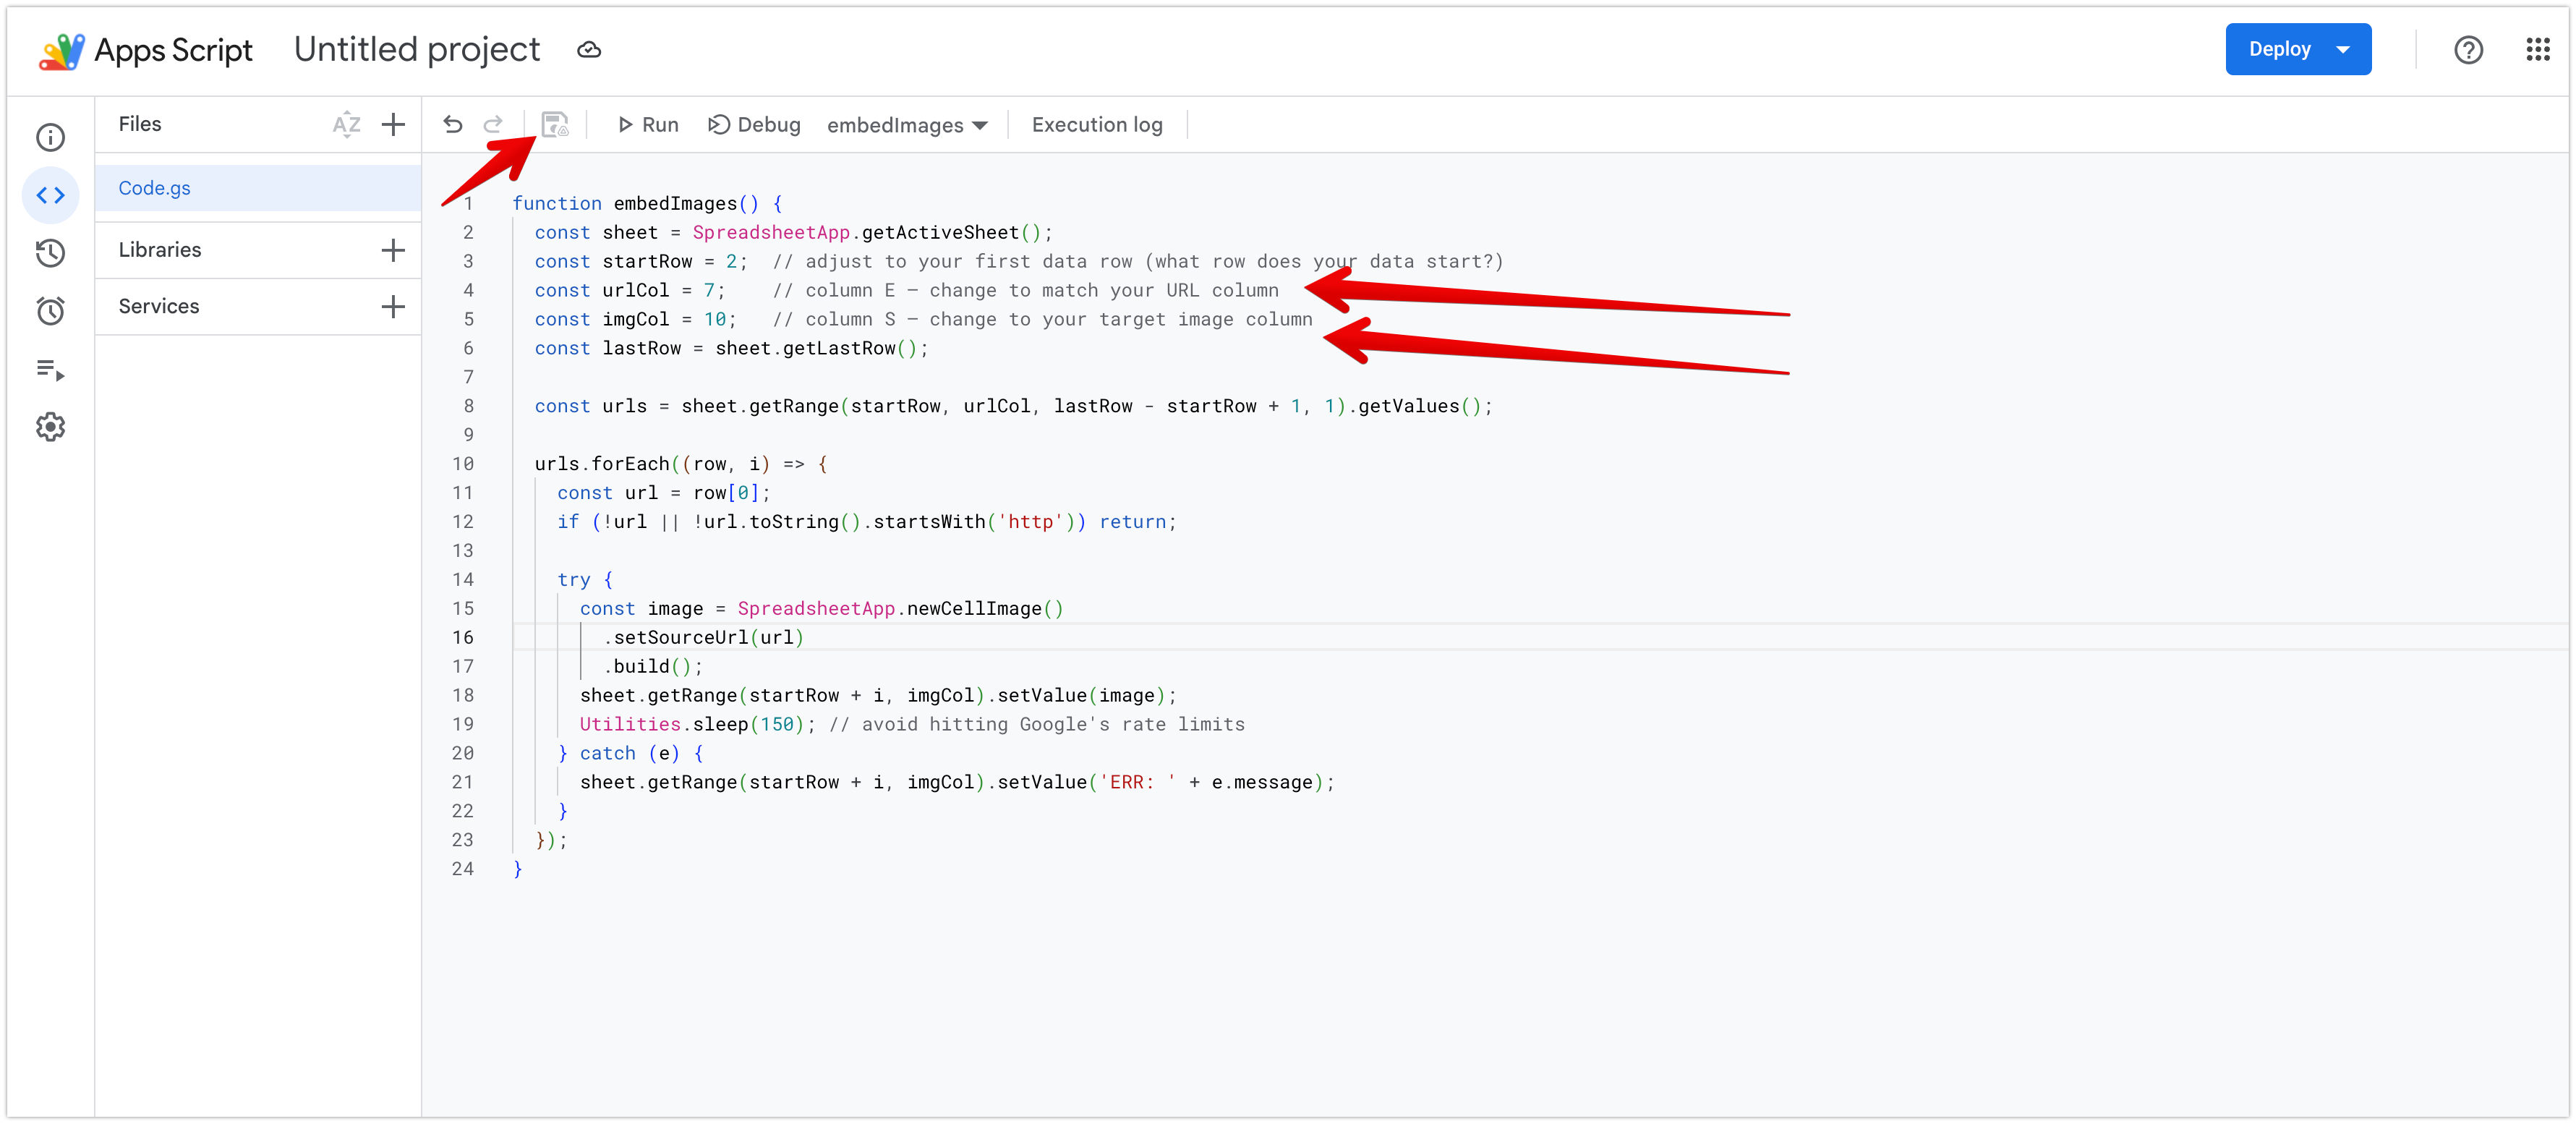
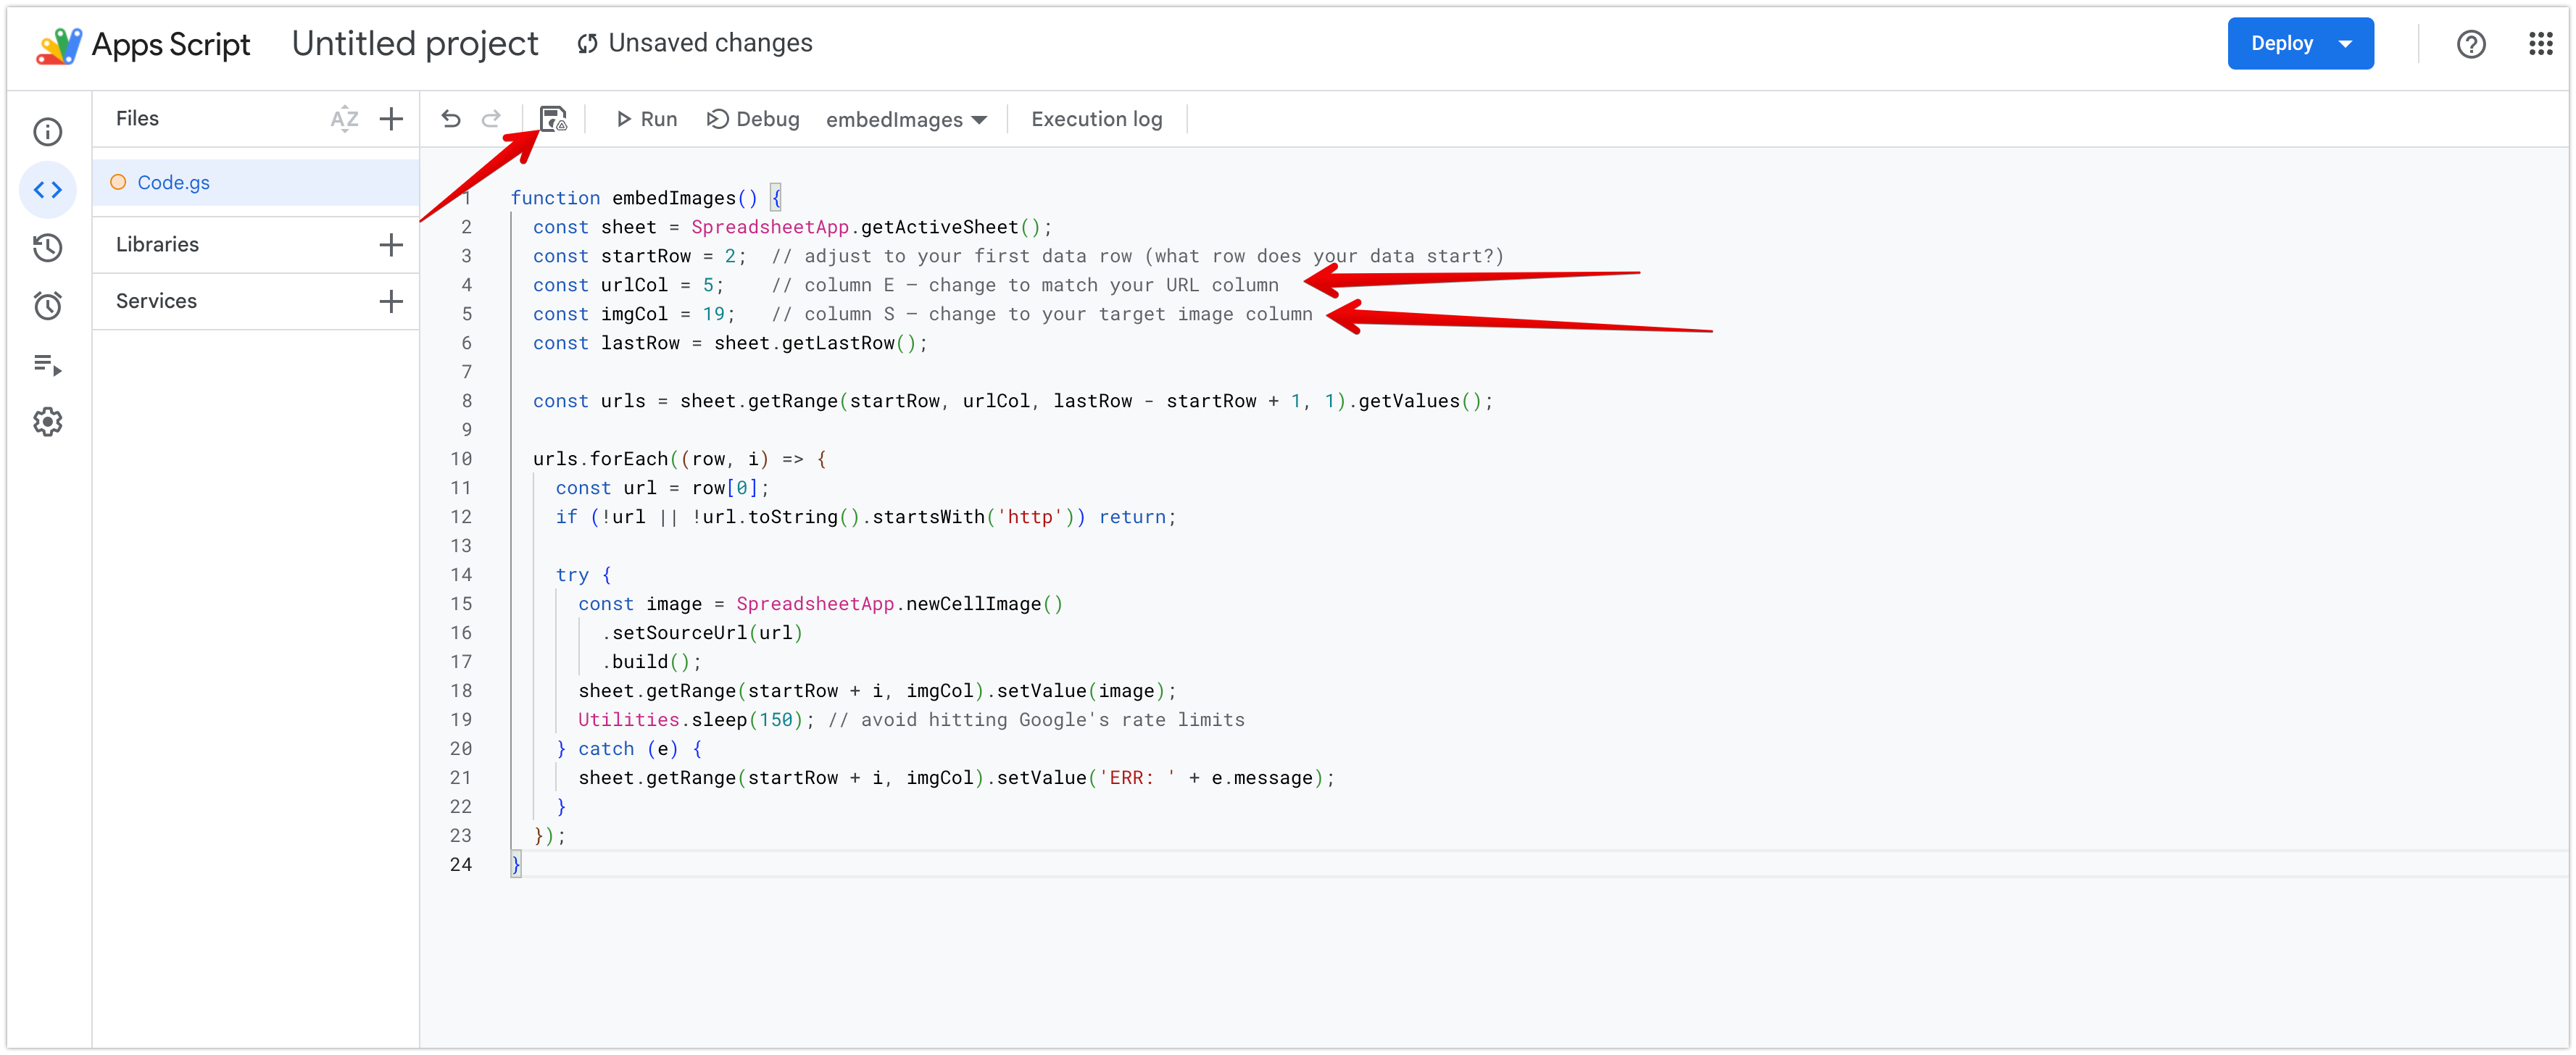
Update urlCol and imgCol to match your actual sheet. The arrows below highlight exactly which two lines to change:
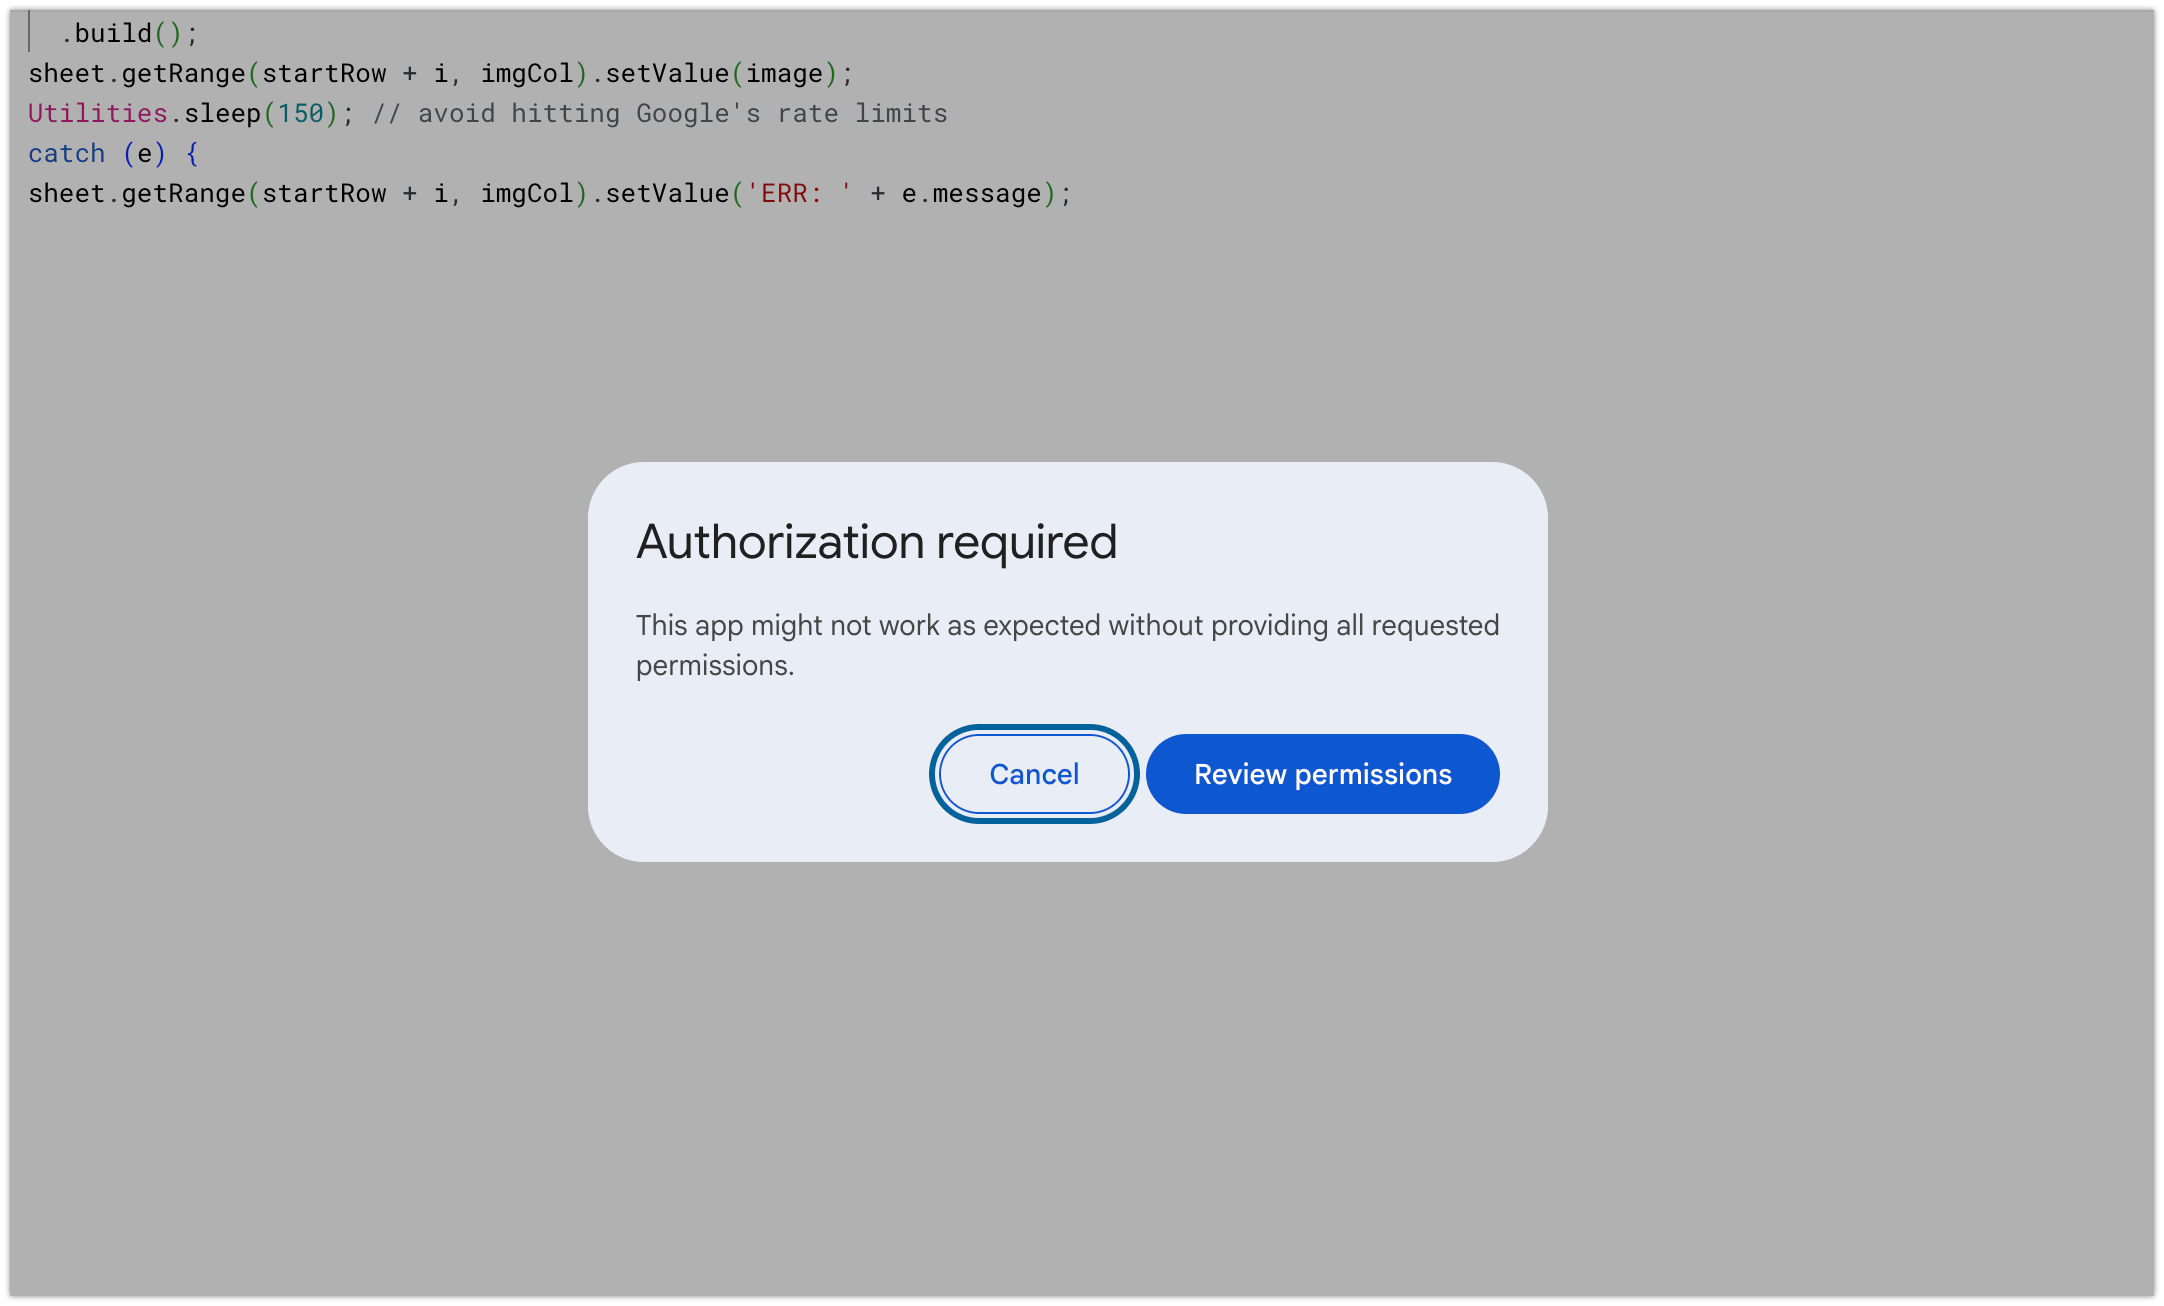
Step 4: Authorize the script
Click the Run button (▶). The first time, Apps Script asks for authorization. Click Review permissions:
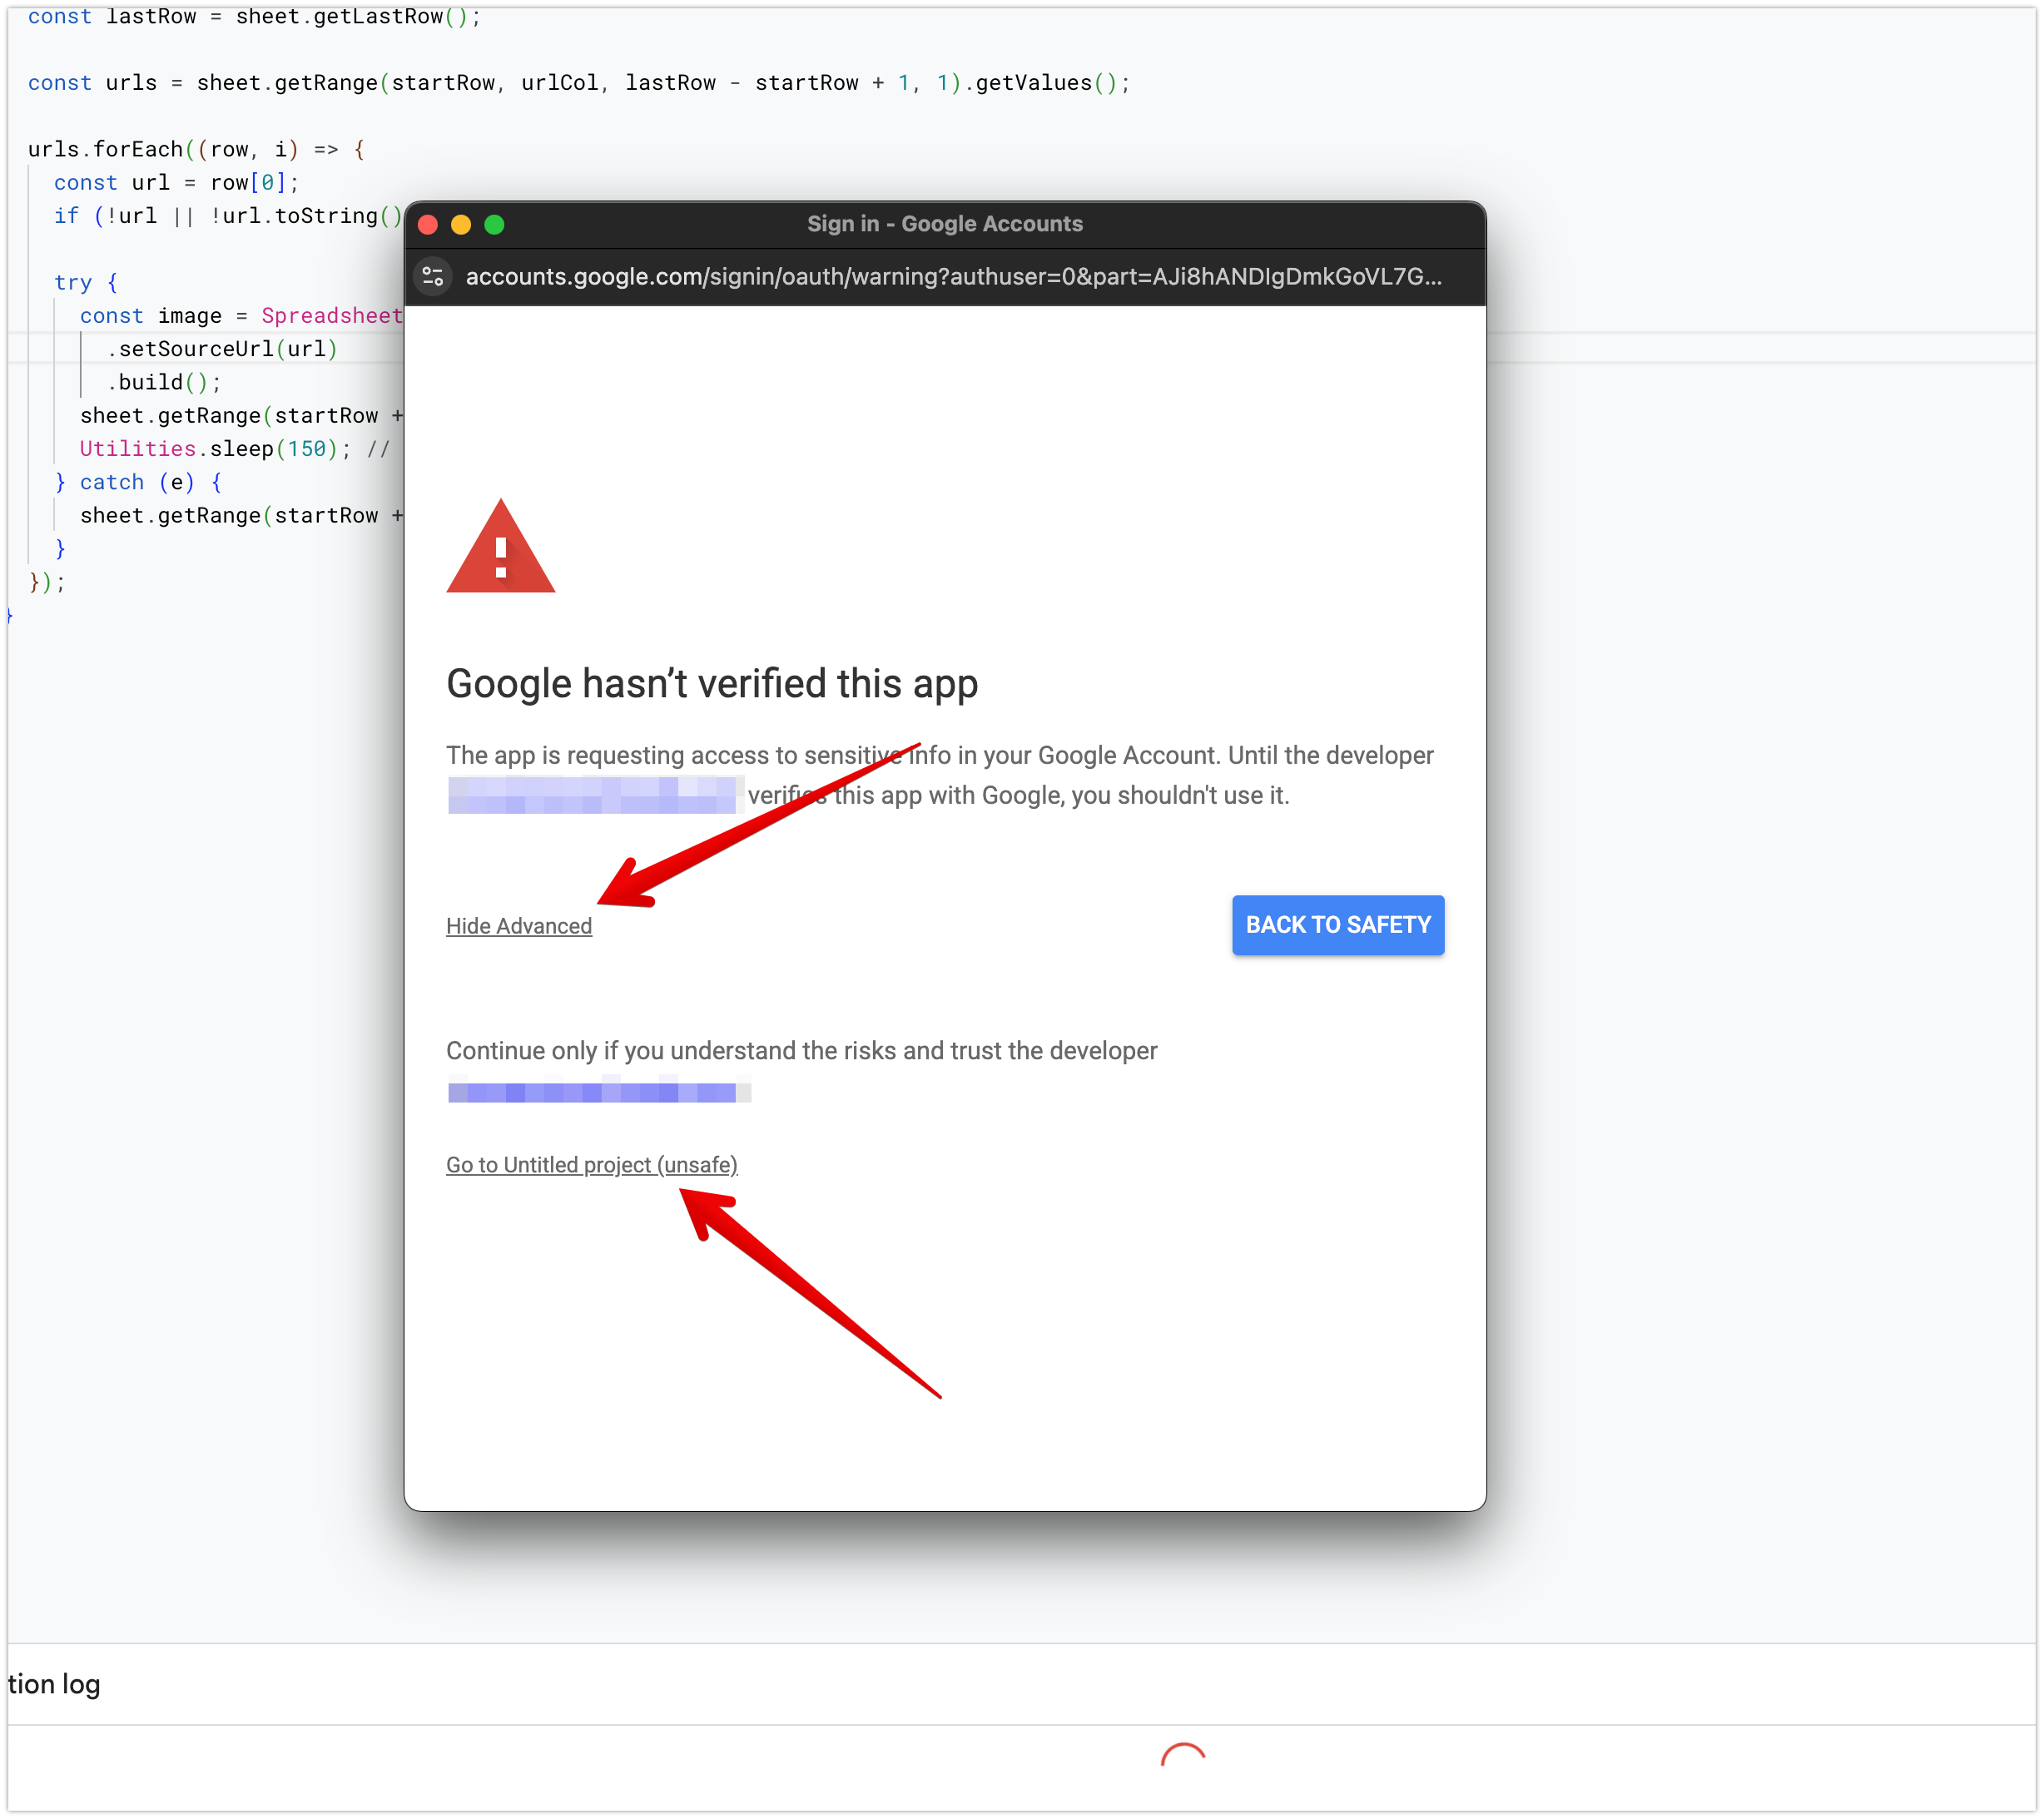
Google will show an "unverified app" warning — this is expected for any personal script that hasn't been submitted to Google for review. Click Advanced, then Go to [project name] (unsafe):
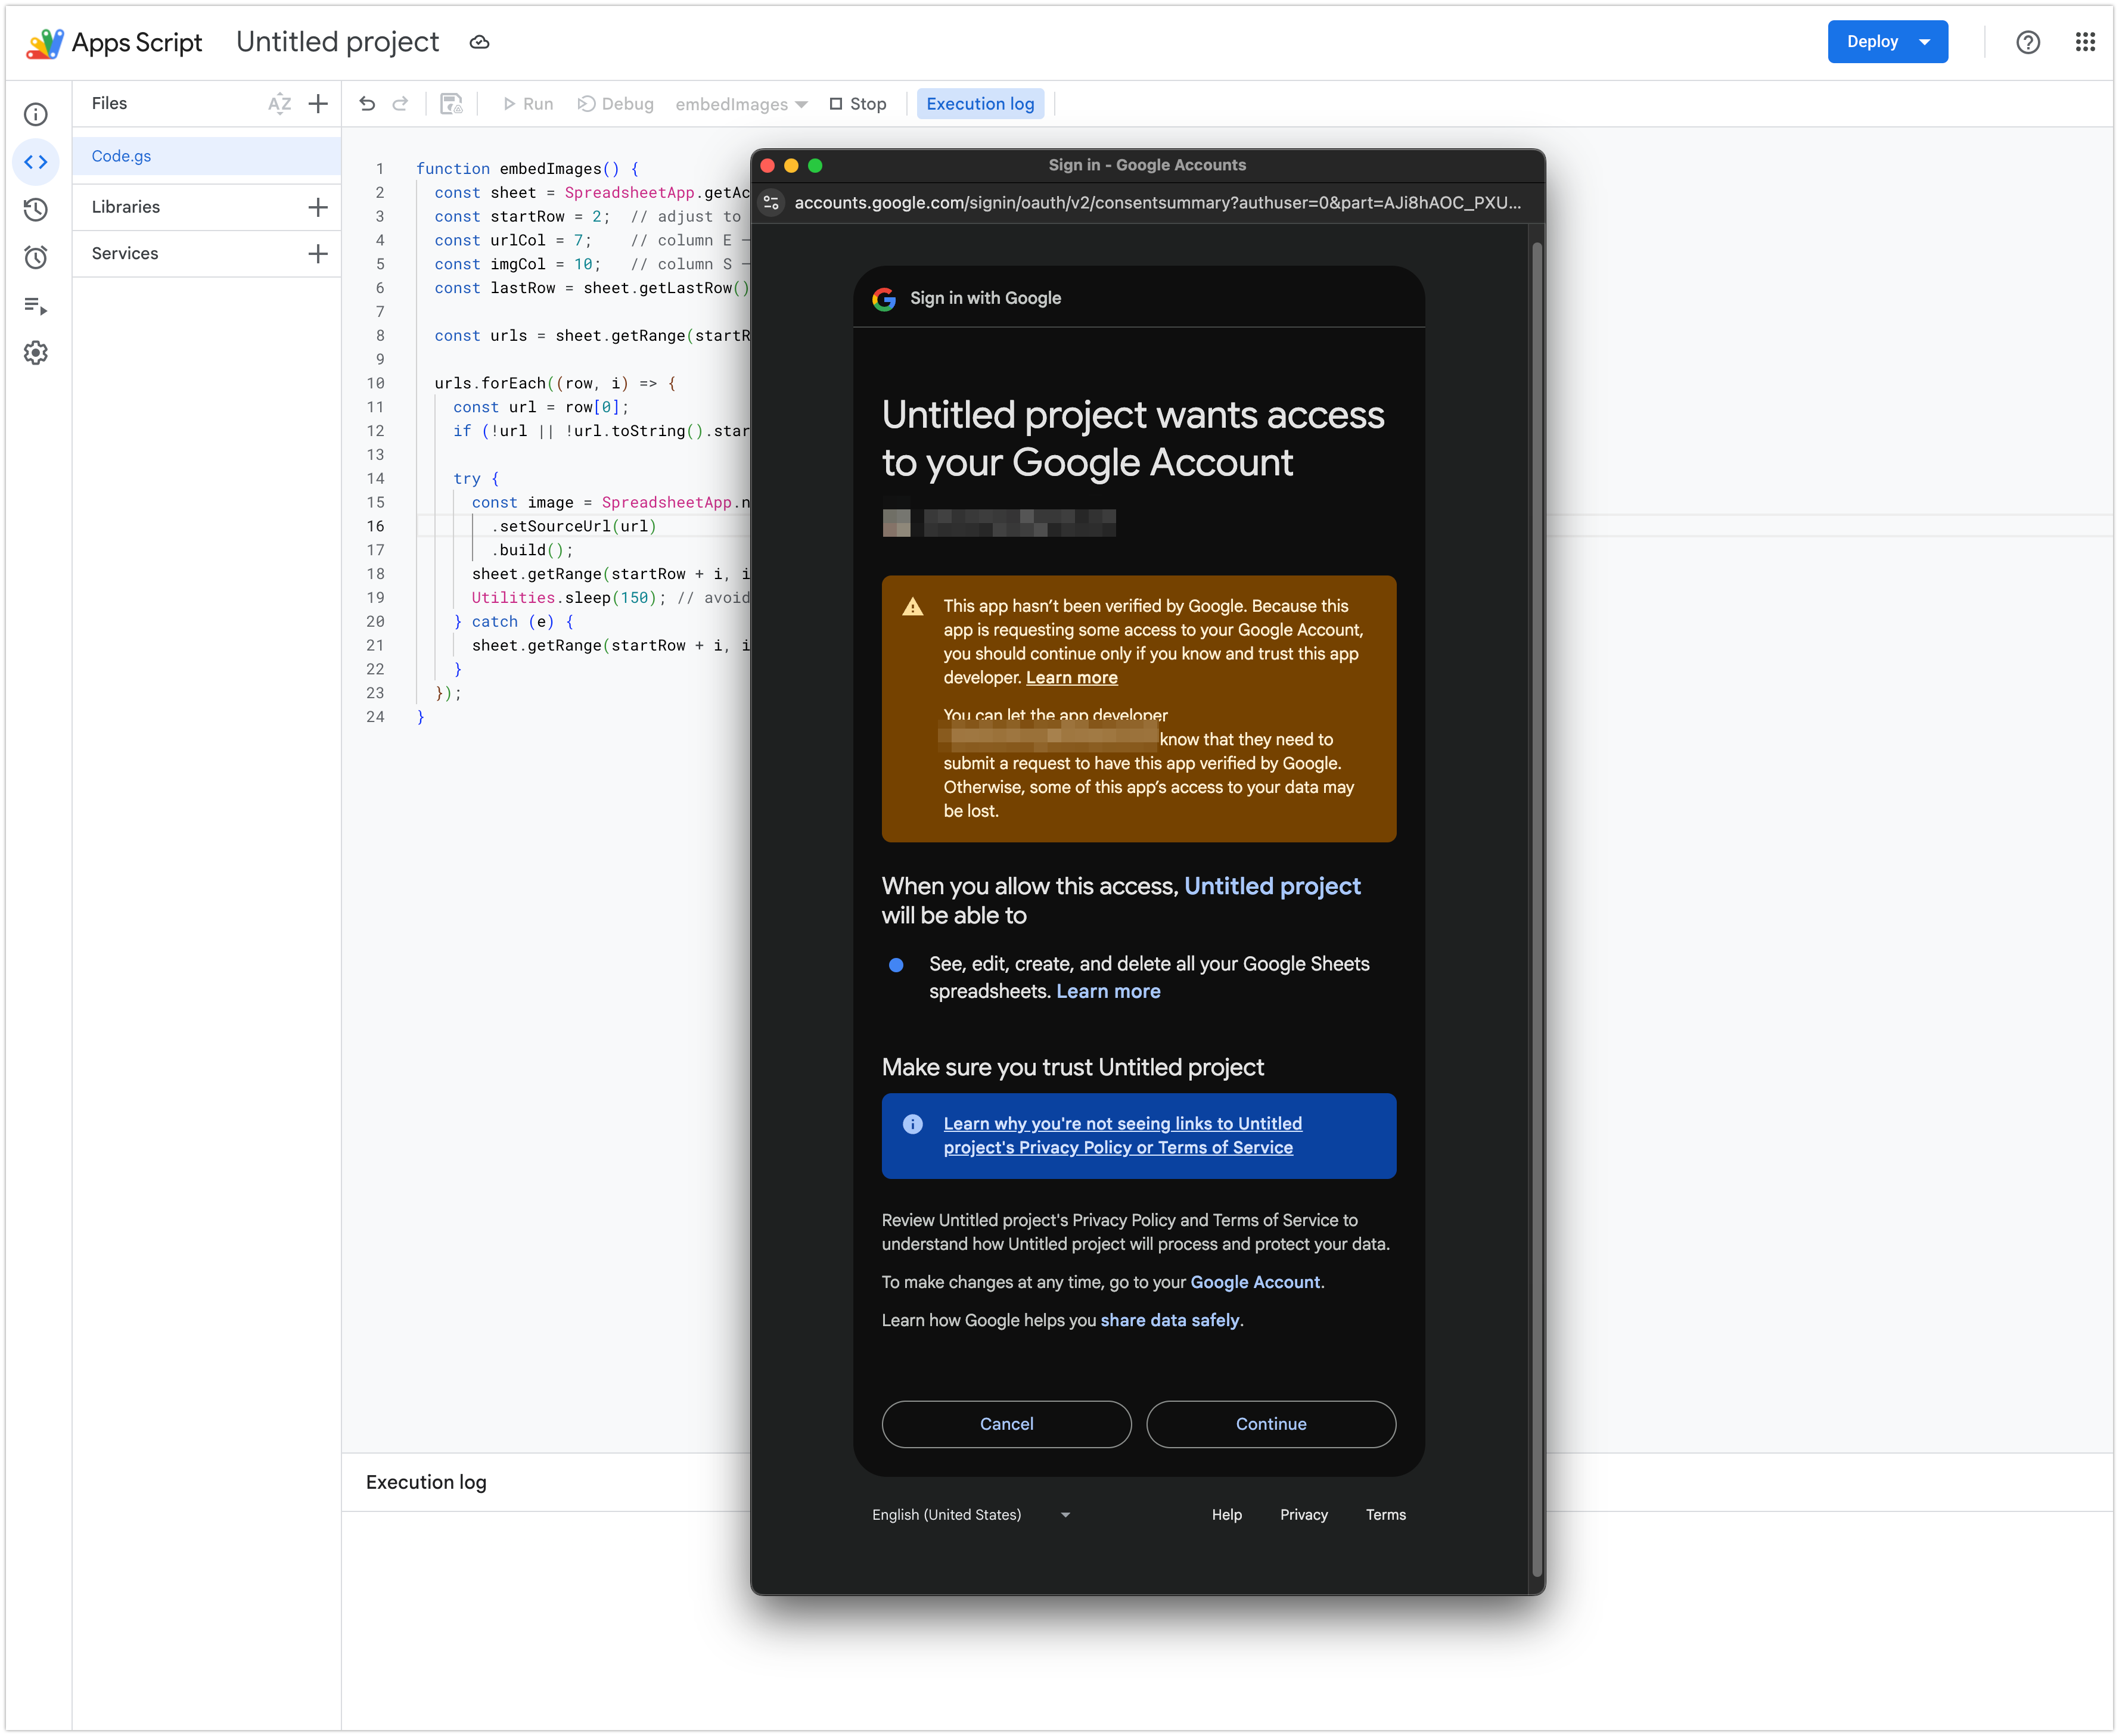
On the next screen, click Continue to grant access to your spreadsheet:
Step 5: Watch the execution log
The script runs and the execution log shows progress:
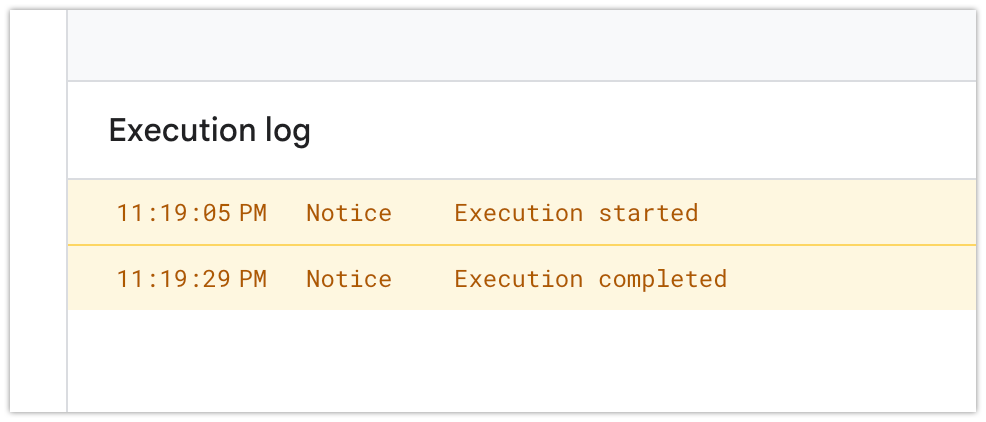
For larger sheets the gap between start and completion will be longer — the Utilities.sleep(150) between rows prevents rate limit errors but adds time.
Step 6: Check your sheet
Switch back to your Google Sheet. The target column now has real embedded images — not formulas, not URLs. Column S is populated with the actual images:
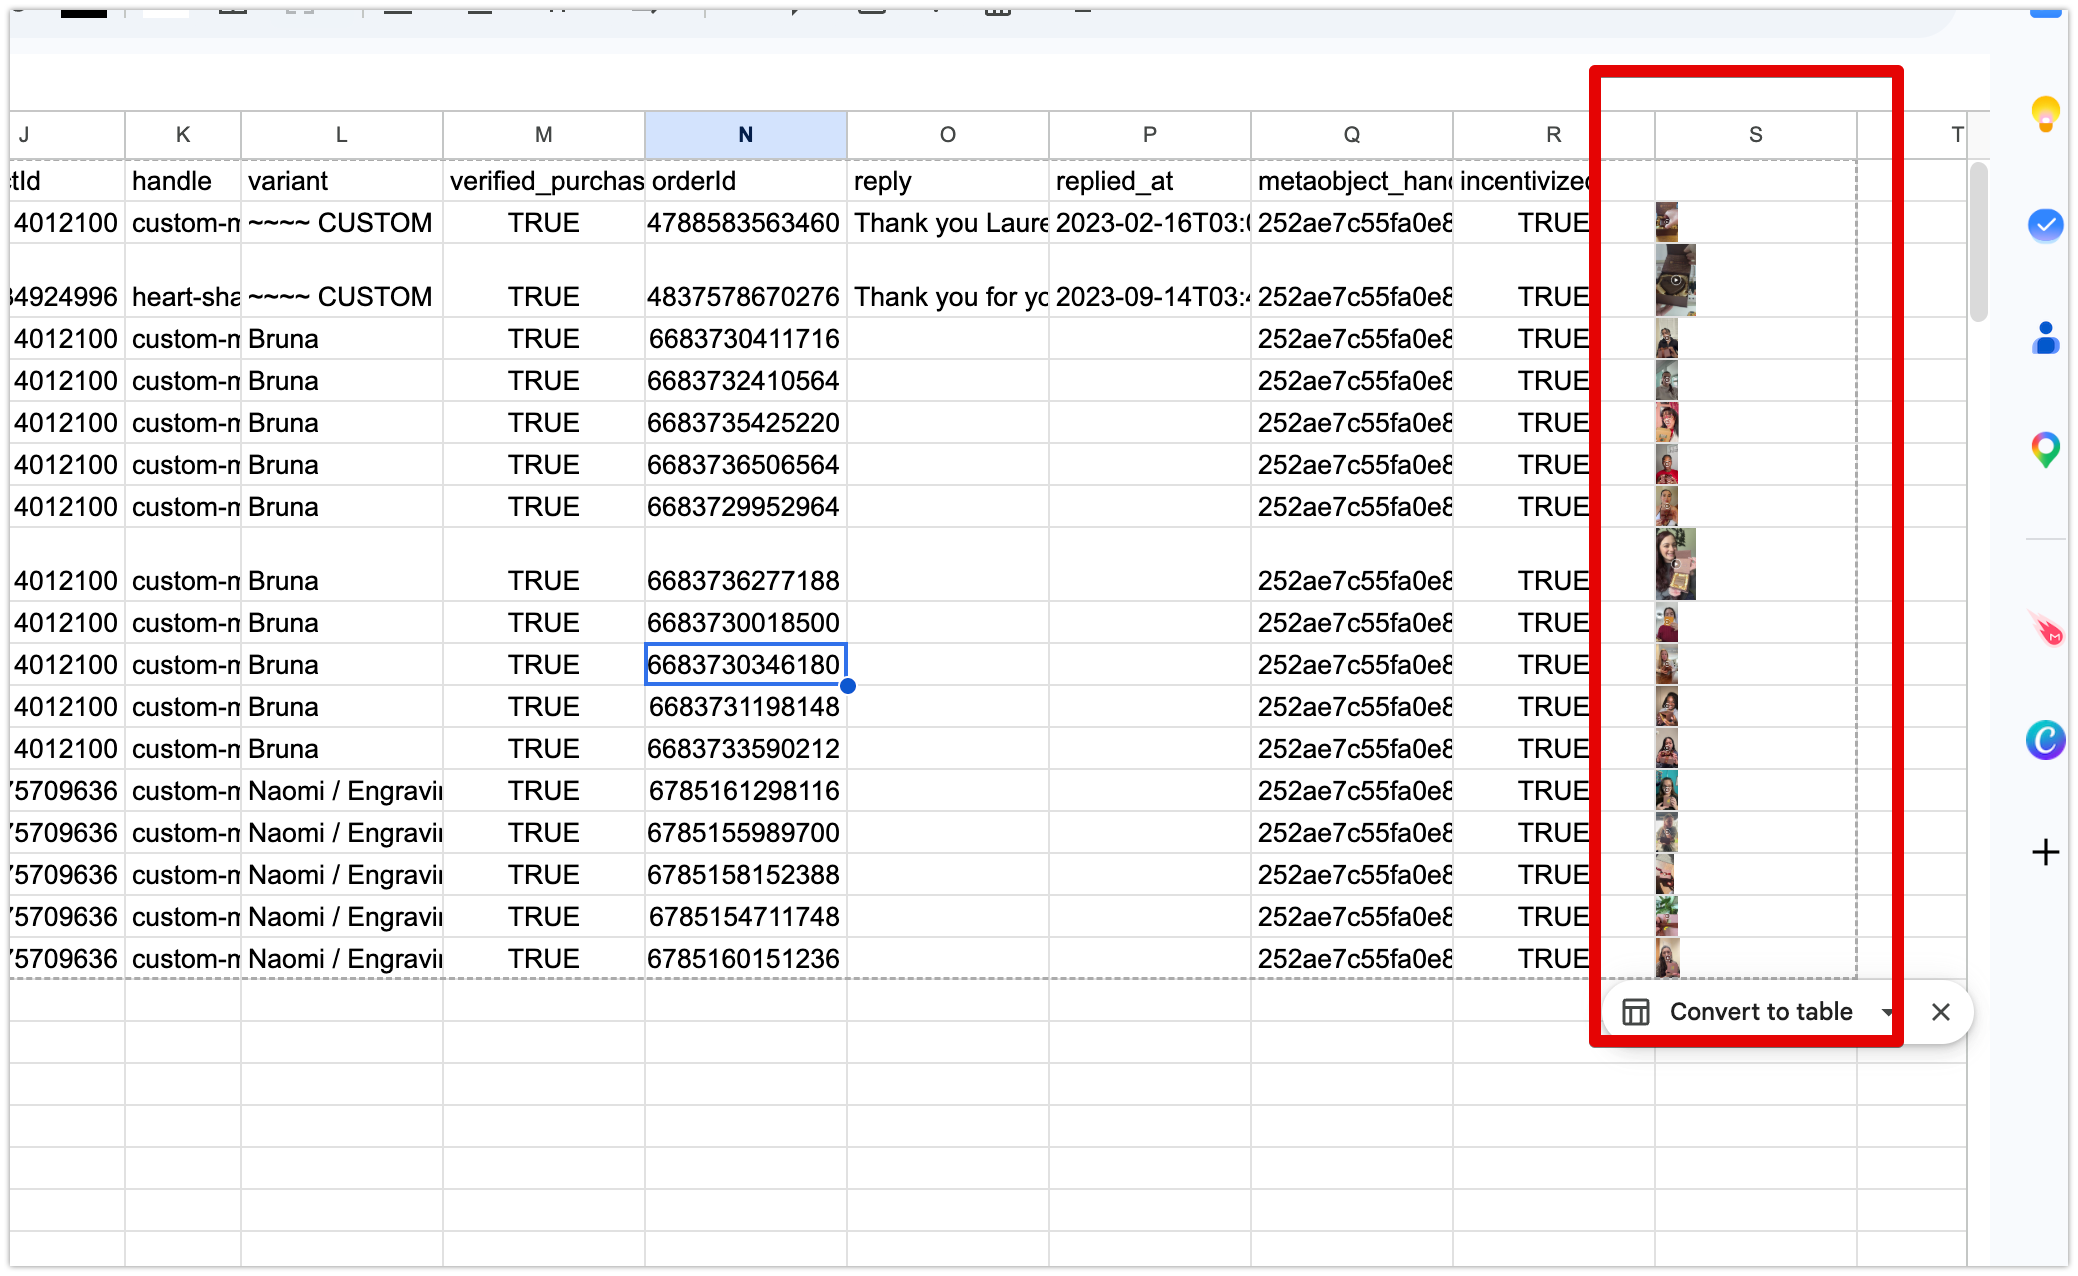
This is fundamentally different from =IMAGE(). Click one of the image cells — the formula bar shows nothing, because there's no formula. The image data is stored directly in the cell.
Step 7: Export as XLSX and upload to Canva
Go to File → Download → Microsoft Excel (.xlsx). Upload the downloaded file to Canva Bulk Create — your images will appear correctly in every generated design.
Limitations of the Apps Script Approach
This works well and it's completely free. But it has real friction worth knowing:
It's slow for large sheets. The sleep delay is necessary to avoid rate limits. 100 rows takes 2-3 minutes. 500 rows takes 15+ minutes.
It needs re-run on new rows. Add new data, run the script again. There's no auto-update.
Column numbers need updating if your sheet structure changes. Easy to forget when you add or reorder columns.
The unverified app warning trips up non-technical teammates. Anyone sharing the workflow will hit friction at the authorization step.
For occasional use on sheets under 100 rows, this is the right free solution. For regular use or larger batches, the friction compounds quickly.
The Faster Alternative
Postprep does the same conversion as a web app — no script setup, no column tracking, no rate limit waits. Upload your CSV or XLSX, select your image column, download a Canva-ready XLSX.
Free for up to 100 rows. One-time unlock for larger files.
The Apps Script approach is the right call if you want to stay inside Google Sheets and can maintain a script. For everyone else, Postprep handles it in one step.
Frequently Asked Questions
Why does Google warn me the app is "unverified"?
Any personal Apps Script triggers this until it's submitted to Google for verification — not worth doing for a script you're only running yourself. Click Advanced → Go to [project name] (unsafe) to proceed. The script only touches your own spreadsheet.
Can I modify the script to skip rows that already have an image?
Yes — before the setValue call, read the existing value in imgCol for that row and skip it if it's already non-empty. That way re-running the script doesn't redo work already done.
Some cells show ERR: ... instead of an image. What happened?
The URL in that row wasn't reachable — expired, behind authentication, or blocked. Fix the URL and re-run for those rows.
What's the column number for my column?
A=1, B=2, C=3, D=4, E=5, F=6, G=7, H=8, I=9, J=10 … S=19, T=20. Click the column header letter in your sheet — the column letter shows in the Name Box (top left).
Summary
=IMAGE() is a display formula — it renders a preview but stores nothing. Canva Bulk Create reads the XLSX, finds no image data, and leaves the slot blank.
The Apps Script approach using newCellImage() actually embeds image data in each cell. The resulting XLSX export contains real images that Canva reads correctly. It's free, it works, and it's the right manual solution for this problem.
For larger batches or a simpler setup, Postprep handles the conversion without a script.